Thursday, February 07, 2008

Food questions and comments


Hey Gary,

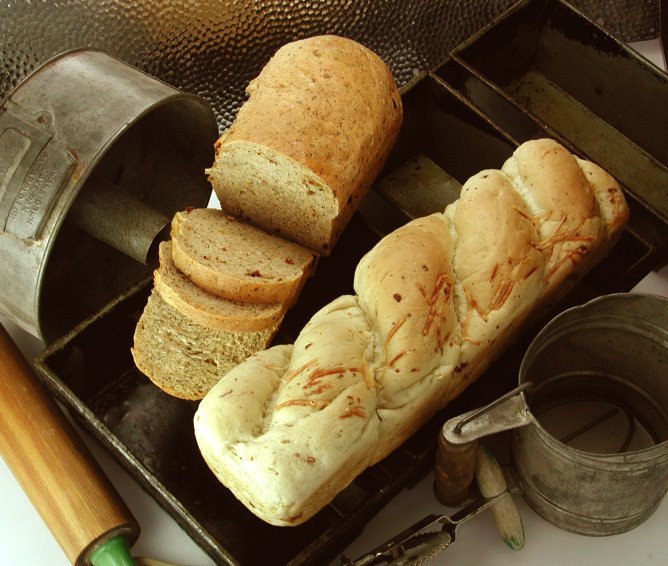
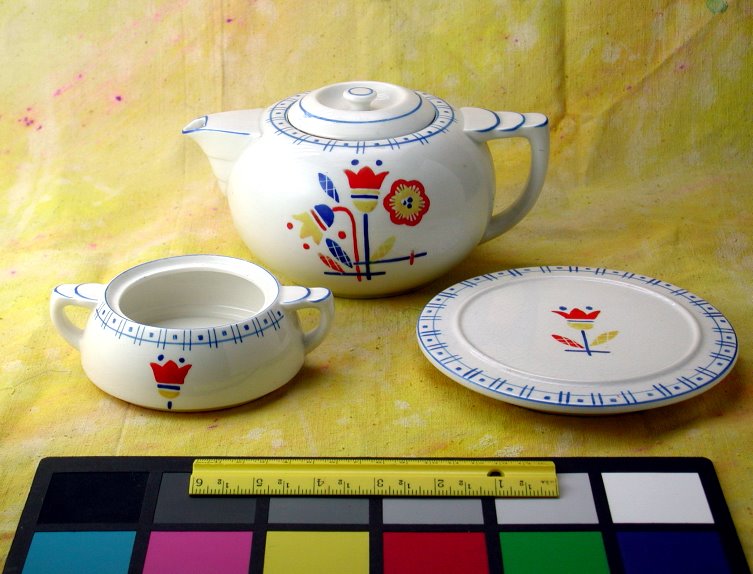
I love your EGO blog - just read through every post. I'm a food writer and food blogger and just picked up a digital SLR for the first time last February. Got 2 EGOs a month ago and have been giving myself a crash course in photography as I’m writing a cookbook. My photos came out fabulous for online, but I am finding that for print quality, it's not working well. I was wondering if you could spare a few moments to take a look at what I've taken and perhaps give me some advice!
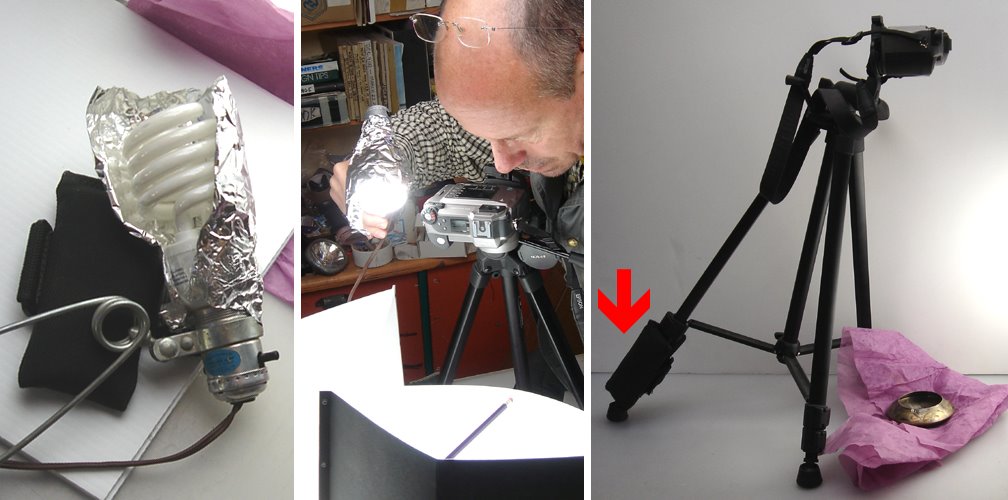
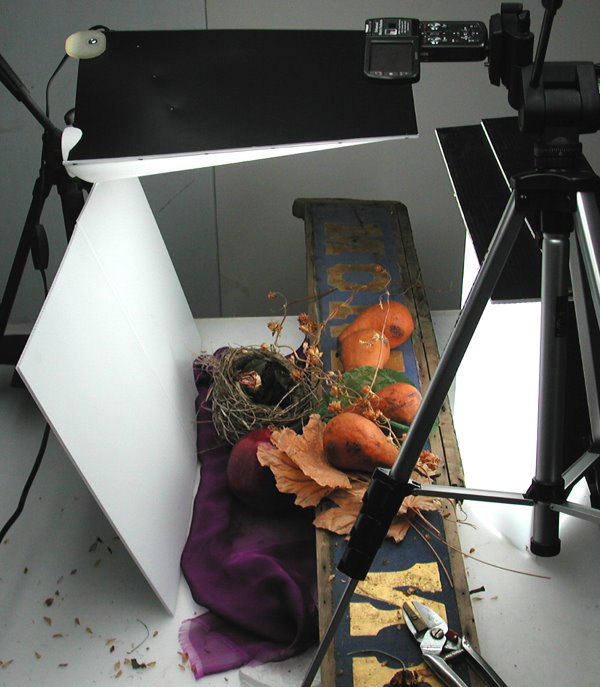
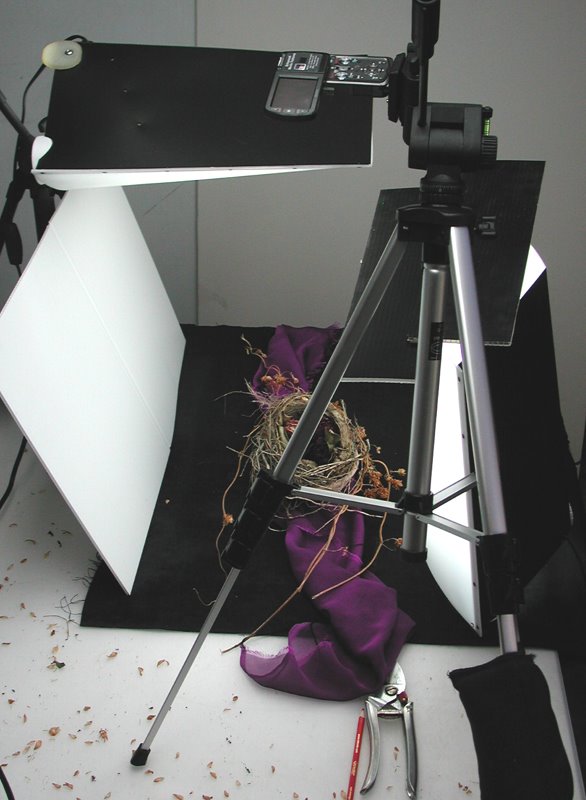
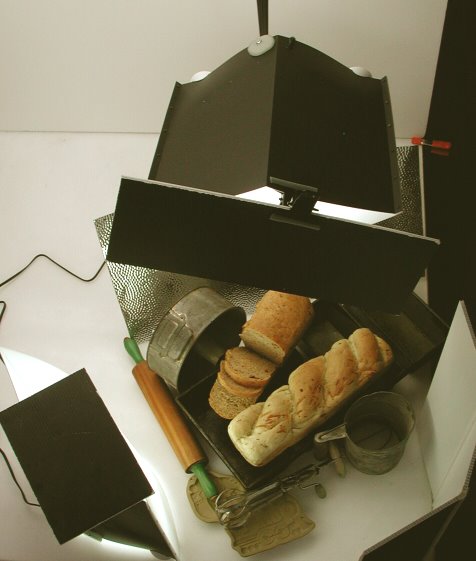
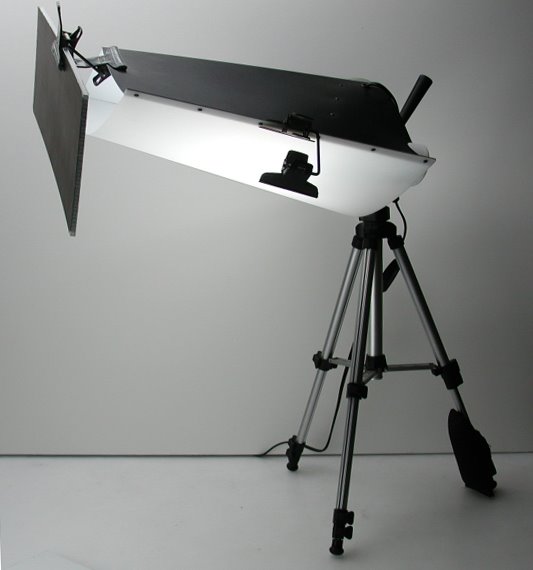
I currently use 2 EGOs. I have a small table 2.5 ft x 2.5 ft. both EGOs sit on the table with the food as I photograph. I also use a white reflector - usually, I hold the white board above the food to reflect light onto the food from the top. I use only 1 EGO lightbulb in each (I have an overhead regular ceiling fan light that I usually leave on); Canon Rebel XT, alternate between my 60mm macro and 50mm 1.4. Usually I shoot at 3.5 - 6.0 . For these photos, I think I shot some of these at 9-10 (shutter speed automatic). While I thought these photos were really good and the photos would be excellent online, I’ve found that when I look at the color proofs, they are not good enough.

My examples are above:
My concerns-
1) burn out due to lighting too harsh
2) food reflects too much of the light and looks either oily or the reflections are blown out I think my solutions are
1) need to move the EGOs further away (although mine are the same distance as you have in your photos)
2) turn off any other light source other than the EGOs
3) either get another EGO or get a stand to position over the food like you do in your studio
4) more selective focus on the food in front (which I think means shooting at 2.2 -3.5)

Any thoughts? Any advice would be SO helpful!! --Jaden www.steamykitchen.com


Dear Jaden-

Food photography is a black art, usually teamwork between food stylists and photographers - something your links show you are very well doing all alone - seems the EGO is being a good help towards that success.

I would suggest:
a) keeping the EGO lights close, but understanding that nonEGO areas are BLACK, not gray.
b) turn off any other lighting that is bright enough to show up in the highlights of shiny details - unless you happen to like its effect - a small specular "bare" light bulb might be just the ticket - see my notes on Jewelry.
c) selective focus will be possible with less light (one bulb on) but the digital cameras have huge depth of field - use max telephoto settings. You may want to consider renting a medium format FILM camera with medium telephoto lens or better, medium format view camera with tilts and swings.
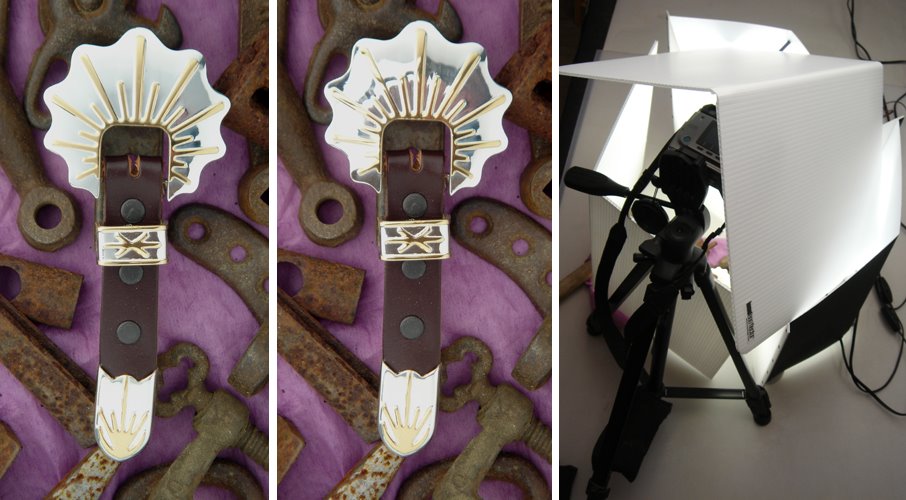
c) most important trial - get some small double magnets (such as used on the refrigerator) to allow you to hold and to reposition colored gels (such as a thin blue, an thin orange and grey ND) and/or black or white paper strips on the surface of the Ego - these would then be move about the surface to change the contrast, color and interest on the texture and shiny details of the food until you liked the effect. Tape the magnets to the surface of the gel. As it is easy to reach inside of the EGO - repositioning is easy.

Give this last suggestion a try and tell us what the publisher says. (I will add our conversation to the blog).

Gary Regester

Hey Gary,

Thanks SO much for all the advice. I've started shooting with just the EGO lights - and working on placement of the lights at different angles and distances.

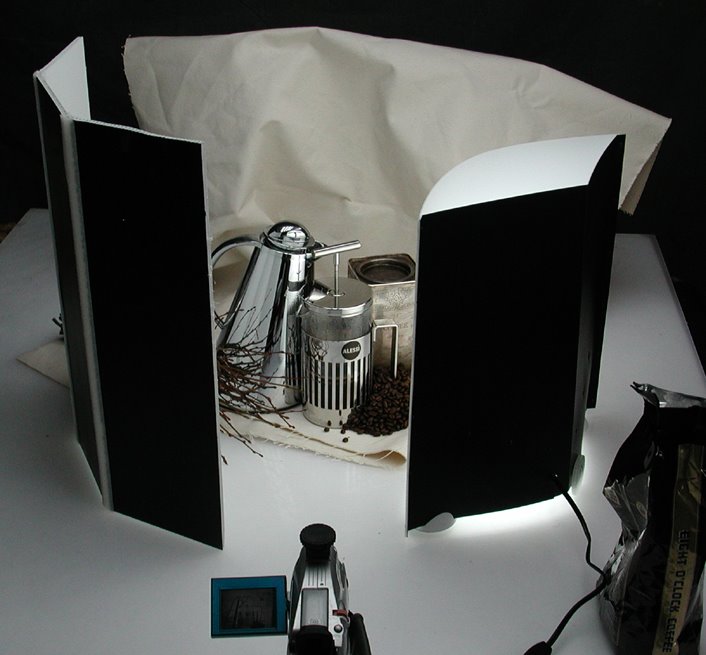
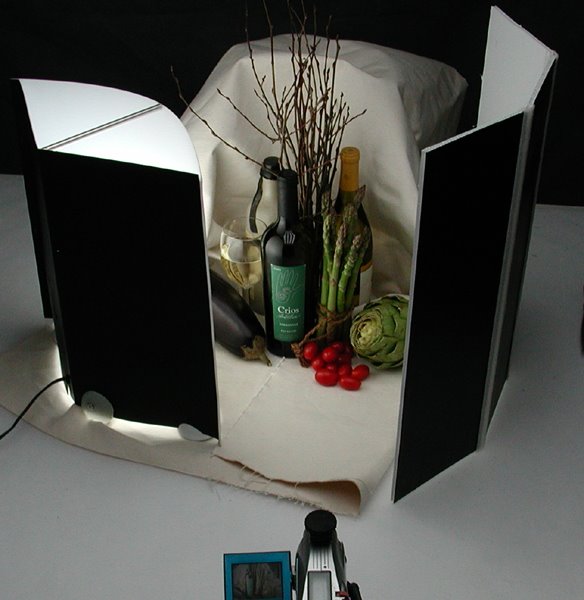
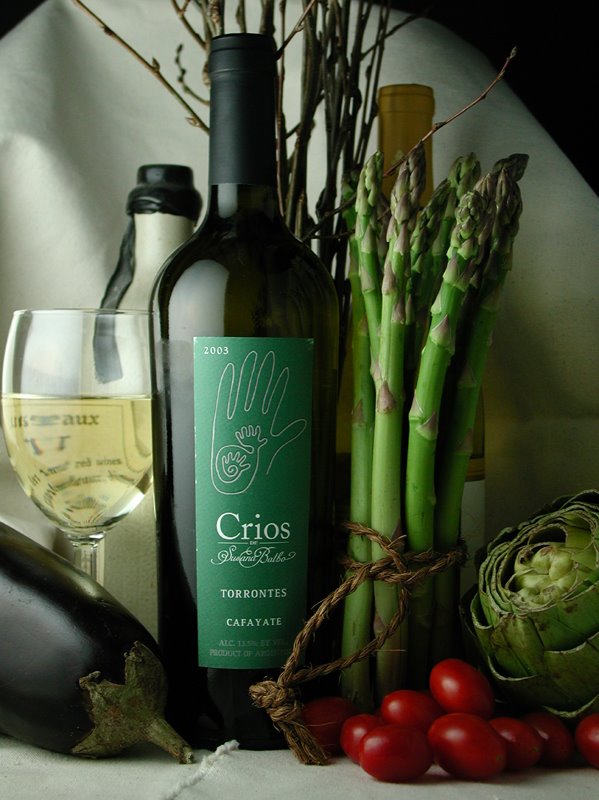
Re: gels…great idea – I’ve started using silk fabric and crinkled tissue paper over the EGO which has produced some pretty cool effects.

Hardest part of what I do really isn’t the photography – but it’s the fact that most of the food I shoot - is what we eat for dinner – so my time is a bit limited AND I can’t do any fancy food styling stuff that would make the food inedible.

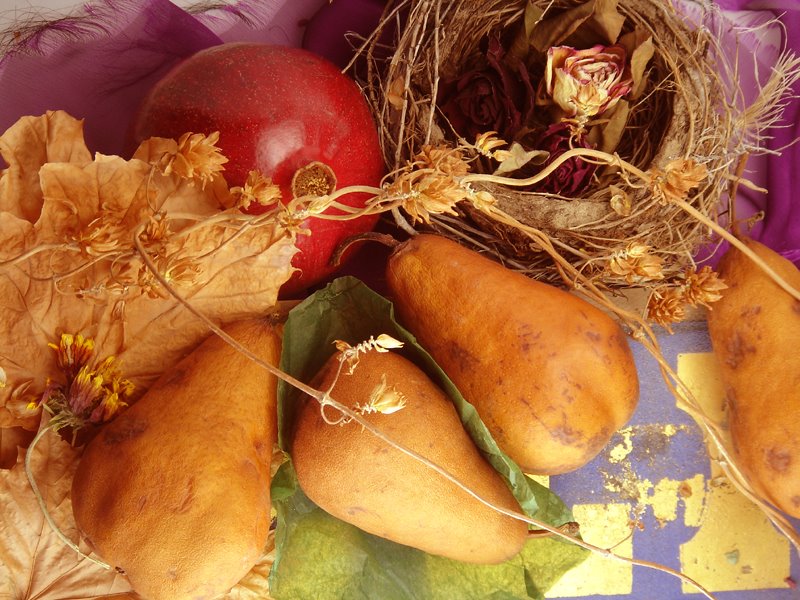
Attached is my latest round of photography. I think much better!

Jaden

Thursday, December 13, 2007

EGO, the light for SAD (Winter Blues) Intervention


My design work for the Columbia University's Clinical Chronobiology and Winter Depression Programs under Dr. Michael Terman led to the development of light diffusion systems for Dawn and Dusk Simulation over sleeping and waking subject and then to lightboxes for suppression of melatonin as it seems to relate to winter blues by improvement of sleep and mood especially due to lack of light in the short winter days or lack of light due to the corporate light deprivation in most workspace cubicles. This version of EGO is re-marketed with two special high output 32 Watt 4100K lamps at SphereOne.com, owned by the CET group - so a portion of sales goes back into research.

EGO, the light for EBay product photography


As this blog has already covered - the classic product photograph has a top light overhead and a side light near the camera. So two EGOs, one atop a tripod and one self standing hnxt to the camera position solve 99% of every EBay power seller imaging need. Take a look at the rest of this blog for examples of every thing from soup to nuts - OK bread to bones.

Tuesday, December 11, 2007

EGO, the light for Video Blogging


Tired of looking twenty years older than Noah while spouting the wisdom of the ages? Yes, it is true that video cameras are now so sensitive you can light your face from the monitor - that's cool, really cool! as the monitors have a native white point that is somewhere in the very blue 7000 or 9000 degrees Kelvin. And your light source is ghoulishly coming from below your camera position. Look at some of these faces on bloggingheads.

Better to compliment yourself and your viewers with a 5000K high color (92 CRI) wide spectrum beauty light - the Lowel EGO was designed to make products photograph even better than life and you are your best product, so....follows.. and it's much cheaper than surgery.

Friday, September 07, 2007

EGO, the light for Art and Craft Work and Reproduction


Any flat art larger than a scanbed is a problem to digitize for the web or print. But with a good digital camera and the four EGOs with two tripods shown here, you could reproduce any flat art and painting up to four by six feet - goal is to cross light at 30 degrees off center from the four corners of the art work - so you are limited only by the height of your tripods or lightstands. Perhaps a bit expensive - as pictured, about $600. Could also be used a painter's daylight high color tasklight as they create the art.

EGO, the light for Museum Conservation


My 200 Watt SCANDLES has done very well with museum and private conservators or art and artifacts due to high color daylight lamps that lack UV and IR (heat). But at $1500 per fixure, it's a bit pricy and specialized. The EGO's first conservation client was the New York Public Library, so that each conservator could have their own high color, but low cost tasklight. Self standing or atop a tripod, cost is still below $200.

EGO - the light for viewing Wine Clarity and Hue


Last night I had a conversation with a winery in Oregon looking for a daylight, color critical, fluorescent SINGLE light bulb for visual examination of wine clarity, color and turbidity. After my explaination about CRI and 5500K, I suggest they take a look at the EGO's website, but the answer was "oh, we're not looking for photo lights". That's my fault. To me, lighting with the wide spectrum high color EGO meant lighting anything with EGO - so yes OK imaging was the first market - but anything else, visual or imaged, is the next market(s).

EGO could easily be the new standard at wine tastings every where as, without a visual repeatable stable standard, the winery in Spain cannot know what the problem is when their shipment reached Oregon, and etc. Just as my Scandles has become a examination standard for condition reporting at world museums - Guggenheim New York needs the same lighting standard as the Guggenheim Venice as Bilboa.

You can buy the single EGO or a pair already on Amazon - but if your winery needs some quantity let me know - also such a light makes an easy POP display in wine shops everywhere.

Next blog will show four other EGO uses other than photography and imaging.

Sunday, October 15, 2006

Lesson 403, Jewelry - Some Easy Hints


In the previous post you see the fourth and loose "lamp" clipped to the tripod with a piece of duffusion material attached in the shape of a triangle, but here it's "down and dirty" with aluminum foil wrapped (carefully) around it and the old man trying to get the subject to give up some "sparkles".

In the third right photo, an easy and cheap way to get the tripod out and over the jewelry - simply extend one tripod leg and use a soft weight from your nearest running or aerobic training supply to create a counter weight on the forward leaning camera and tripod. Or tape a one pint or one liter water bottle to one extended leg. ARROW is pointing at the "training" weight bag.

Lesson 402, Jewelry - Sparkles


Jewelry can be the hardest of all photographic subjects - you have high contrasts - bright silver surfaces and dark black leathers or velvets, you have "gems" that must reveal polished surfaces but you must also show their transperancy and depth with some sexy sparkle here and there.

The usual, but not 100% solution is to create a broad light source with graduated brightness - a single even light source will not reveal the curved surfaces of your subject. In the example above we have removed one of the lamps from the EGO closest to us - so EGO ONE, full brightness, EGO TWO, half brightness, but brighter on the side nearest EGO ONE - then a the white card to complete the "circle" of broad light around our varied subject.

Compare the photo on the left with the one in the middle. To add some "sparkle" we have placed the light bulb we stole from EGO TWO into a clipon socket very near the camera lens and, then carefully watch where it "pops" open the reflective metal and glass and stone surfaces. See close up photo on the next post.

Lesson 401, Jewelry - Gold, Silver


Simple silver with gold belt buckle. First, this is were the 5500Kelvin color output makes EGO "shines". As explained in the earlier post, the Digital technology is weak in the blue and very strong in infrared (hence, night vision goggles) - try get good looking silver and gold with Tungstun - dont believe yet - here's a FREE no cost test.

Get a silver (metal) wrist watch and set it on a moveable card with a color reference chart. Photograph your setup with a digital camera under tungsten light - any household Edison lamp will serve - these lamps are about 2700 Kelving. Then carry your card with watch and color reference outside to an shaded side of your building - open shade will be about 10 to 30,000 Kelvin - may several more digital exposures. Now compare in Photoshop or similar - which light source resulted in the best silvers and golds?

SETUP Above: Here are two EGOS with two reflector cards arranged to create a full "spherical" tent. The belt buckle photo on the left is with the "roof" reflector in place and, the photo in the middle, the "roof" has been removed. Note the difference.

Why is the light from EGO better than anything else?


As the concept designer of EGO, I forget that the very special lamps used by the EGO are nearly 10 years in the making especially for digital and video capture. They have four important features - small and compact; "photo" daylight balanced 5500Kelvin; high color rendering (92CRI+)for visual and film use without filters; and no IR (infrared) to distort digital. Together with the illustrations above, here's a quick primer about light - REMEMBER light meters read ONLY GREEN of photopic vision and not blue or red - in the top chart, the meter would be reading the same, that is, both 2700K and 6500K have the same quantity of green - so a lot of tungsten light does not translate into a lot of light on the meter, but especially not a lot of light on the digital chip - read why.

First, a Quick Primer in Continuous Light- O.K., boys and girls, keep those pencils sharp. What is the first thing that comes to your mind, when you think the words, "Continuous lighting?" By chance, is it, "Tungsten Light"? (aka: quartz halogen, incandescent)? Certainly, tungsten light was the first and last thought in the "minds" of many photo salespersons. But tungsten light matched with digital imaging is the worse possible continuous light source - the HOT devil incarnate. (You will be tested!) Why?

REASON One: No blue! and no blue. If good color balance (neutral silvers and grays0 is important to your image, then you must match the weaknesses and strengths of the sensitivity of your media (digital) to the weaknesses and strengths of the output of the light. Tungsten light at 3000K has less than 10% of its total visual output with in the blue [400 - 500nm](5500K is B33%, G33%, R33%). This could and should be at least EQUAL RGB (5500K) for digital capture meaning at least 33% in the blue (400-500nm), or as it is with 6500K- the color of overcast sky - a little extra blue (chart top). On the same count, Digital (CCD) sensitivity has the similar input problems -less than 10% sensitivity of the chip to blue (see above bottom). S0 -No Blue and No Blue. Junk in, junk out and no amount of PhotoShop magic will create color that was never there on two counts.

Now compare CCD sensitivity. Go to Kodak's great resource on this subject- http://www.kodak.com/go/ccd and print out any of their color CCD PDF files that strike your fancy, but especially the sensitivity curves of Kodak's so called "extra-blue" CCDs (fourth chart above). Also, if possible, note sensitivity curves with and without the IR blocking filters. Which brings us to-

REASON Two: The invisible HEAT of tungsten distorts CCD imaging. The CCD is 10 times more sensitive to Infrared (aka: heat) than visual light. Tungsten visual spectrum is only 7% of the supplied energy, and the balance of the 93% is anti-imaging infrared (aka: heat) that travels out to the subject with the visual spectrum. Take a look at the IR in tungsten output at: http://www.osram.com/service_corner/glossary/popups/17.html

Carefully compare the Kodak CCD PDFs (as example, the lower charts above compare daylight film with an "extra blue" CCD chip) you downloaded above for CCD sensitivity with and without the IR blocking filters - heat is a big problem. IR filters help somewhat, if properly designed, but IR "cut-off" filters also cut out tungsten's already overrich visual spectrum in the far red.

From the book "Lighting Technology" by Brian Fitt, Focus Press, 1997 - "The tungsten lamp is a heat generator from which we can get a little light. The conversion of total electrical energy produces only 6.5% light and 93.5% wasted heat." The author further notes that that heat travels with the spectral makeup of the light to the subject and back to the camera. Heat entering a digital camera distorts the entire RGB visual response (study the Kodak charts) but especially in the already weaken blue channel - hence, shadow noise, bad dark greens, grays and silvers without balanced RGB.

Sunday, July 09, 2006

Lesson 304, Still Life - Poms, Pears and a Nest


Two more examples of two Lowel EGO setups of nonreflective still lifes.

Further posts will be examples created in response to your questions, suggestions and comments. Fire away!

Lesson 303, Still Life - Sticks and Stones, no Bones


The task of the image maker is to evoke three dimensions in reality onto a two dimensional surface of media - be it onto web, print, moving film or video. Having said that, here are some sticks and stones photographed as "flat" and 2D as we can make them with an EGO - single EGO is positioned tight against the camera.

Lesson 302, Still Life - Coffee Pot


Again, the rounded light quality from the single EGO clearly shows up to enhance the mirrored metal surface of the subject.

Note that ALL photos on this blog can be clicked for an enlarged study of details.

Lesson 301, Still Life - Wine Glass and Bottle


As promised earlier, the "300" series would feature "art". And "art is in the eye of the beholder". We will start with five still lifes, which are more intented for "art" than commercial use, and will leave the question of "what is art?" for others.

The point to be made here is that the EGO configuration presents the subject, a wine glass and bottle first, with a clean and unobsturcted light source - and that the falloff of light values across the face of the EGO diffusor is from center to corner and this effects a lovely reflected highlight in the subject's glass and additional roundness on the imaged subject's other surfaces.

Lesson 204b, Squaring Off Flat Art


Yes, they're right - it's all done with smoke and mirrors. OK, no smoke.

The quickest way to square the camera to a piece of art is to position a mirror (without touching the fragile surface of a painting or other art work) FLAT (Critical!!) against the center (Critical!!) of the art and place the camera so that the center of the lens appears in the center of the mirror.

As with the example above, we have drawn an "X" from corner to corner on the mirror to help find the center of the mirror and visually find in the refection, the center of the lens.

In the example above, we have used blocks to get the center of the mirror up to the center of the art. With larger art, one may need attach the mirror to the center of a card of equal size to the art work.

Lesson 204, Digitizing "Flat" Art and Paintings


Two dimensional "flat" art such as a photographs or illustrations are probably most easily and quickly digitized with the use of a scanner - that is, up to the size of your scan bed. Larger photos and drawings can be easily digitize by a simple copy setup using two EGO lights as shown above and your digital camera.

The usual thinking is to center and cross light the art with each light source placed at about a 40 to 45 degree position in relation to the art on a copy board. Several important considerations:

NEUTRAL COPYBOARD- Copy board should be covered with a middle value neutral color such as middle grey so as not to influence the exposure and color balance.

COLOR CARDS- Again, reference to some known standard is important for reproduction or the understanding by the viewer.

SIZE- Rule of thumb is that the art should be equal or smaller than the light sources, but you can certainly sneak up to about 150% before the falloff of the light at the top and bottom become objectionable - so with 16 inch EGOs - to art work up to 24 inches tall - the width is not the problem. If the art is taller, then consider using four EGOs positioned to direct light across the four corners of the art - a post we will make later on.

PAINTINGS - Paintings, also considered "flat art", are more 3D with additional qualities of texture or gloss that the artist would like revealed or suppressed. You may need to add a white card to show up a gloss area or a piece of black velvet (or velvet paper) surrounding your camera position (cut much larger than the art work) to kill a gloss area. Pushing the EGOs back to a 30 degree or less postion will deaden possible highlights of textured paintings.

SQUARING- You need to be dead straight on to the center of the flat art inorder to have four parallel sides - this one task can take hours - see the next post for a easy solution.

Thursday, July 06, 2006

Lesson 203, Forensic Documents


Here is almost all that was left of a young Rocky Mountain sheep after two mountain lions had their feast at about the 10,000 foot level this spring on the south facing (warm) slope of the 12,000 ft mountain to the north of Silver Plume - this portion of skull and a thick layer of fur and blood laid out across an old mining road.

The EGO is a perfect inexpensive illuminant (aka- task light) for forensic or museum study and imaging - high color (92+ CRI), 5000 degree Kelvin (daylight with equal red, green and blue) and no radiant heat (93% of the energy from Edison's tungsten is infrared [aka: heat]) to further destroy the object.

Again, as with the bread and ceramic photograph, we use two EGOs - top/back boomed and front fill self standing EGOs and color reference cards. But here note the many white cards to open up the shadows and further reduce contrast, yet not to eliminate the necessary texture/information of our skull.

Lesson 202, Making Bread, Baking Bread


The baker or the restauranteur need good attractive images to help sell their offerings. Here are some specialty loafs of bread by Silver Plume's own Sopp and Truscott Main Street bakery. Add a few not-too-subtle props and you have an nice food shot.

Again, the classic product formula - top/back EGO up on a boom/tripod with front fill EGO self standing on a table - as in the ceramic photo earlier.

Lesson 201, Making $$$ - EBay Ceramic


These "200" lesson series will consider "commercial" imaging to help sell or promote a product (as opposed to portraits [100 series] or "art" [300 series, yet to come]).

OK, we need to move the wife's (husband's) ceramic collection on EBay. Two light classic set up - one EGO overhead to create a top/backlight to show texture across the top of the subject. And a second EGO to the side of the camera postion to, again, show good texture and 3D roundness to the object's "face".

The third photo shows how to easily "boom" the EGO using a small tabletop tripod to create the "top/back" lighting - see that we weight the opposing leg with a small ankle weight that you can find in a gym supply.

Notes:
Color/gray card references - with any object or art work that is color critical for resale, include a color reference of some kind - the card shown in these blogs is a Macbeth (Munsell) ColorChecker Chart, about $80usd. A Kodak Color Separation Guide (cat 152 7654) is about $25usd. OR, at no cost, use any well known color object to give the web or print viewer some reference of any color inbalance - as example in the USA - Kodak yellow, CocaCola red, Morton Salt blue.

Size references - again, give the view some help with size as well as color, here a ruler, but can also be any known object or, perhaps a hand.

Clips and "barndoors" - always postion and block any light source from stiking the lens with black cards or black fabric.

Lesson 105, "Key" and "Fill" Portrait


Again we are using our two young models and our two young EGOs. "KEY/FILL" is the classic formula of portrait photographers (but there is no One Way! - Amen). The idea is that the "KEY" light (the light farthest to the left and closest to our subject in our set up photo) creates roundness and depth, aka 3D, in the subject, while his assistant, "Phil" (the EGO back at the camera) opens up the shadows and flattens the overall image.

So, two opposing ideas! - one light creates contrast or 3D and one light creates flatness or 2D- so that the two have to be balanced inorder to result in a smooth successful portrait. Easiest way to increase and decrease the light intensity is to move the lights towards or away from the subject. Remember your physics class, Lambert's Inverse Square Law states that you double the distances, the radiant body is one quarter the strength (or something like that). So closer, our KEY, the brighter. The farther, our "FILL", the dimmer - and the "falloff" is amazingly quick. Another way to reduce the brightness of the "FILL" EGO is to loosen (aka turn OFF) one of the two lamps. Note again the light foreground and reflector card to further reduce contrast and open the shadows.

Friday, June 30, 2006

Lesson 104, Blue Grass Musician


Here are two EGOs up on books - a slight underlit portrait of our hat wearing musician, George Downing, folkie extraordinaire of Silver Plume, Colorado.

The trick here is to light the background (hintergrund) with one of the two EGOs while at the same time "broad" lighting our "talent".

Again, as with the earlier portraits, we use both the light and a reflector card as close as possible to the subject and avoid any source light from the EGO reaching the camera lens to avoid flare.

Lesson 103, Male Executive (almost) Portrait


Certainly the cheapest corporate model I know - me. This is a ONE EGO example.

The need for a simple, quick and "kind" portrait with a digital camera is rampant - for the news release or corporate PR portrait. The built in flash will not cut it. So - get an EGO, find a table and small tripod positioned next to a white or warm neutral wall - and you're in business - corporate business.

Again, keep the EGO as close as possible to the subject. Avoid having the EGO direct any light (aka flare) into the lens. Keep the light at eye level of the subject. If there is no white wall, place a large piece of white paper or white card opposite the EGO - OK, the wall is dark brown - sneak a couple of push pins into the wall to hold up the white card. The more white cards the more "kindly" the portrait- one underneath the subject is an excellent idea.

Lesson 102, Portraiture


Probably the first thought to use or aquire a small broad light source is in order to make portraits or small products photographs. This is our starting point. A couple of notes before we begin - Lowel Light's website for EGO and the recent article in the Circuits section of the New York Times. And the various one EGO setups on the Lowel website.

This blog will attempt most solutions with two or more EGO units. Please feel free to question, comment and submit photos to us. We will post the photos with our comments on regular posts.

OK, here's our girls featured on the LOWEL site. But here we have two EGOs side by side placed at our subject's eye level by placing them on several of the nearest books we can grap - hopefully you live in a huge city and phone books will suffice. If there is a rule of thumb, the light source should be the same size, as in this case, to our subject - three smallish girls - and the closer (up to seeing the light source) the better.

Note our small reflector card - one comes with each EGO and the larger the better. If you can place your subject next to a white or neutral colored wall, even better. Human beings do not usually see how dark the room really is - the addition of a reflector of a white or silver material is a great asset. Again, should be at least the size of the light source or larger. The example here is too small.

Let's hear from you.

Tuesday, May 30, 2006

TEST Page for search engine

Wafer Light Diffusion banks, softboxes, lightbanks light modifiers
Profoto balcar broncolor dyna-lite norman